Quick Summary:
The organic fertilizer manufacturing process has 7 core steps: raw material selection, composting (6–12 weeks), crushing/mixing, granulation, drying/cooling, screening, and packaging. Composting is the most critical step—keep the pile at 55–65°C for at least 72 hours to kill pathogens.
Setup costs range from $100,000 for a 1–5 tons/hour plant to $550,000 for a 10–20+ tons/hour line (plus 20–30% for installation and training). The biggest mistakes to avoid: skipping fermentation, untested raw materials, undersized equipment, and ignoring dust control.
Setting up an organic fertilizer plant can feel like a minefield. Between conflicting claims from equipment vendors, hidden costs, and quality failures that can ruin an entire batch, it’s easy to make expensive mistakes before you ever sell a bag. I’ve spent eight years helping over 300 clients build plants, and I still watch people trip over the same obstacles—untested raw materials, skipped fermentation, undersized machines, and poor location choices that eat profits alive.
In this guide, as a professional organic fertilizer production line manufacturer, I will give you a clear route through the full organic fertilizer manufacturing process: raw material selection, composting (the step that makes or breaks quality), crushing, mixing, granulation, drying, cooling, screening, packaging, plus realistic cost figures, common mistakes to avoid, and pro tips to help you produce consistent, high-quality fertilizer from the start.

Why Should You Care About Organic Fertilizer Manufacturing?
Let’s start with the opportunity.
The global organic fertilizer market was worth around $11 billion in 2025. By 2031, it’s projected to hit $18.46 billion. That’s not a slow crawl. That’s a sprint.
And in 2026, the sprint is still accelerating.
Why? Because farmers are tired of watching synthetic fertilizers destroy their soil. They’re looking for something that feeds the plant and feeds the ground. That’s exactly what organic fertilizer does.
But here’s the thing: you don’t get paid for producing “organic fertilizer.” You get paid for producing consistent, high-quality organic fertilizer. And that starts with the process.
So let’s break the whole thing down, step by step.
Organic Fertilizer Manufacturing Process
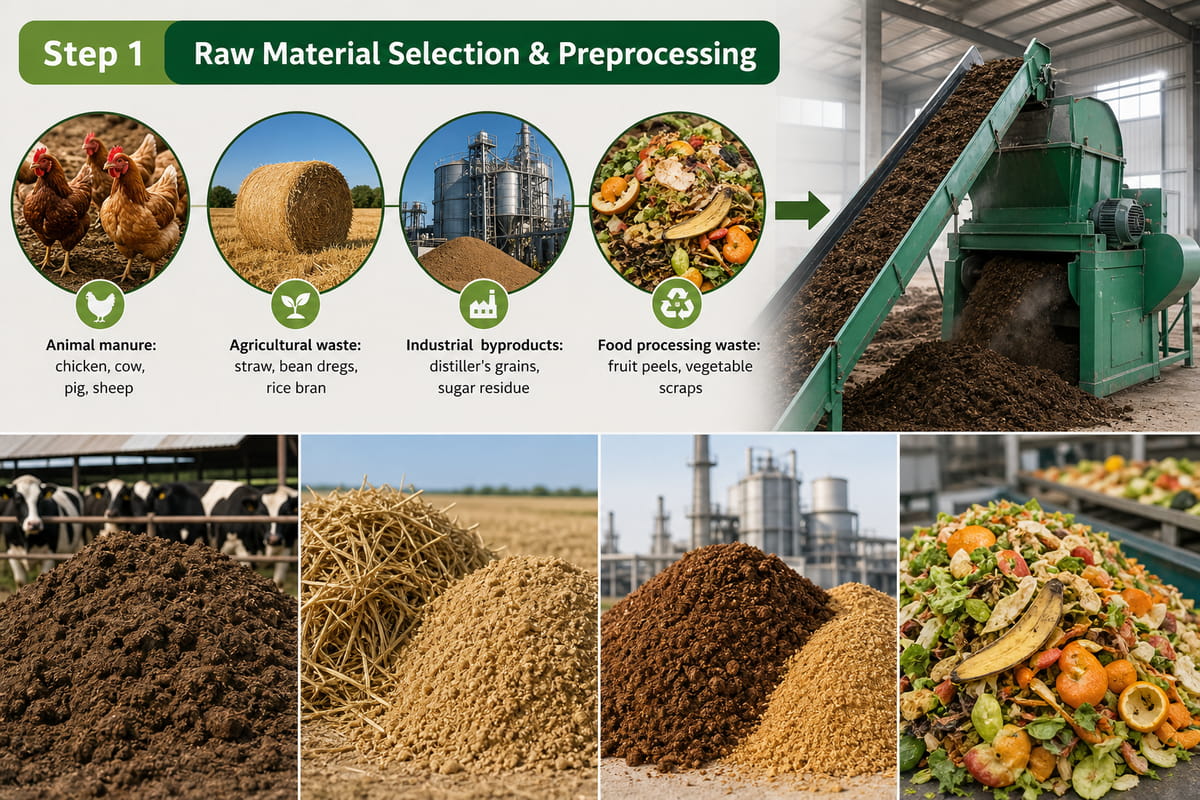
Step 1: Raw Material Selection & Preprocessing
This is where most startups fail.
I’ve seen it happen more times than I can count. Someone gets excited, buys equipment, starts a production run, and then realizes their raw materials are garbage. Guess what? The finished fertilizer is garbage too.
Your raw materials are the foundation of everything.
Common sources include:
- Animal manure: chicken, cow, pig, sheep
- Agricultural waste: straw, bean dregs, rice bran
- Industrial byproducts: distiller’s grains, sugar residue
- Food processing waste: fruit peels, vegetable scraps
But don’t just grab anything you can find. Test your materials first.
You need to know your N-P-K values. You need to know your moisture content. And you absolutely need to check for heavy metals. I once saw a startup use untested sludge from a nearby factory. The heavy metal contamination ruined their entire first batch. They lost tens of thousands of dollars.
Let me explain what you should actually aim for:
- Carbon-to-nitrogen ratio: 25:1 to 30:1
- Moisture content: 50% to 60%
- Particle size: Small enough to compost quickly
Here’s a quick trick: grab a handful of your material and squeeze it. If water drips out, it’s too wet. If it crumbles completely, it’s too dry. If it holds its shape but doesn’t drip, you’re in the sweet spot.
Pro Tip: Don’t build your plant far away from your raw materials. Transporting manure 100 kilometers can add $15 to $20 per ton to your costs. That can wipe out your profit margin before you even start.
Step 2: Composting & Fermentation (The Most Important Step)

This is nature’s crockpot.
Microorganisms break down your raw waste into stable humus through aerobic fermentation. Skip this step, and you’re not making fertilizer. You’re making toxic sludge.
Here’s what needs to happen:
You pile your materials into windrows or fermentation tanks. You add a bit of fermentation bacteria. Then you turn the pile every 3 to 5 days using a compost turner.
The temperature profile tells you everything:
- Days 1–3: Around 104°F (40°C). Initial decomposition begins.
- Days 4–7: 130–160°F (55–70°C). This is the thermophilic stage.
- Hold above 130°F for at least 72 hours. This kills pathogens and weed seeds.
If the pile doesn’t get hot enough, you won’t kill the bad stuff. If it gets too hot, you’ll kill the beneficial microorganisms you actually want.
When is the compost ready? Finished compost should be dark brown, crumbly, and smell earthy. It should not smell rotten. This usually takes 6 to 12 weeks depending on your materials, climate, and turning frequency.
Don’t rush it. I know you want to get to the granulator. But the fermentation stage is where the quality is created.
Step 3: Crushing & Mixing

Once your compost is fully mature, it’s time to break it down.
A crusher pulverizes clumps into a uniform powder. You want most particles to be under 2mm. Why? Because fine, uniform powder leads to uniform granules later. Lumps and oversized particles will ruin your final product.
After crushing, use a mixer to blend everything evenly.
This is also the stage where you can add nutrient amendments. Want a specific N-P-K ratio? Add it here. A horizontal mixer ensures every granule gets the same balance of nutrients.
Step 4: Granulation (Where Powder Becomes Product)

This is the step that separates powder fertilizer from granular fertilizer.
The mixed powder gets fed into a granulator. The granulator forms spherical particles that are easy to store, transport, and apply.
You have a few options:
- Disc granulator: Lower cost, good for small plants
- Rotary drum granulator: Higher output, produces harder granules
- New type organic fertilizer granulator: Great for high organic content materials
Granulation isn’t just about making pretty little balls. It gives you real business advantages:
- Easier handling and storage
- Lower transportation costs
- More precise application in the field
- Better shelf life
- More consistent nutrient release
Pro Tip: Don’t undersize your granulator. I’ve seen too many startups buy equipment for “today’s capacity” and hit a bottleneck within months. Buy for next year’s capacity, not this year’s.
Step 5: Drying & Cooling

Fresh granules are still fragile. They come out of the granulator with too much moisture.
A rotary dryer brings the moisture content down. Here’s the important part: keep the drying temperature under 60°C. If you go too hot, you’ll kill the beneficial bacteria that make organic fertilizer valuable.
After drying, use a rotary cooler. This quickly reduces the temperature of the granules. It also keeps them from sticking together and makes them harder.
What should your final moisture content be? Aim for 12% to 18%.
Too much moisture and your granules will clump, mold, or turn into mush. Too little moisture and they’ll crumble into dust before they leave your plant.
Step 6: Screening
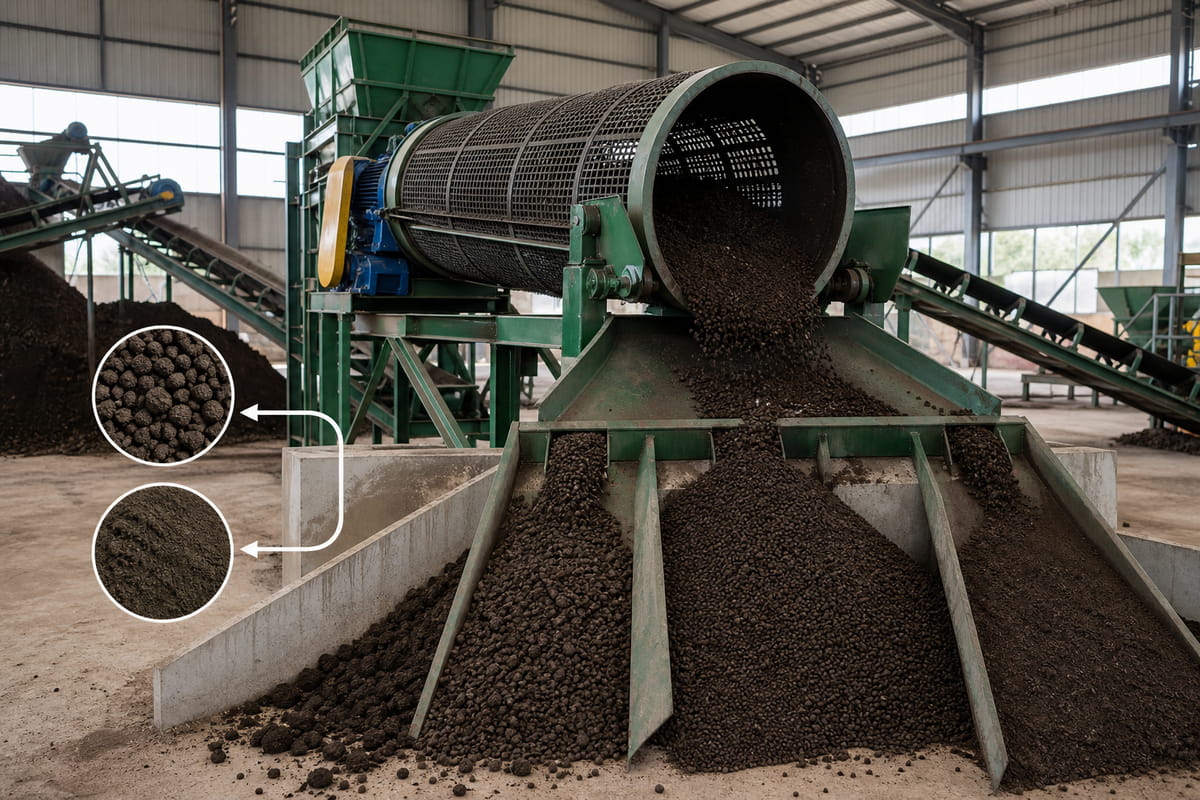
Not every granule is going to be perfect.
A rotary drum screen separates the good granules from the rejects. Oversized and undersized particles get sent back to the crusher for reprocessing.
This step might seem optional. It’s not.
Farmers notice when granules are uneven. They notice when half the bag is dust. Poor-quality granules destroy your reputation in the market. Screening ensures every bag that leaves your facility is worth recommending.
Step 7: Packaging & Storage

The final step is packaging.
An automatic packing machine weighs and bags the finished granules. Most operations use 50kg bags, but you can customize based on your market.
Here’s the thing: quality control doesn’t end when the granules come out of the cooler. It ends when the product is on the farmer’s truck.
Before every batch leaves your plant, check:
- Appearance
- Odor
- Particle size
- Moisture content
- Nutrient content
One bad batch can destroy years of trust. Do the inspections. Every time.
Powdered vs. Granular Organic Fertilizer: Which One Should You Make?
This is a big decision.
Powdered organic fertilizer is simpler to make. You just ferment, crush, mix, screen, and package. Less equipment. Lower investment. But lower price per ton too.
Granular organic fertilizer requires a granulator, dryer, cooler, and screener. It’s more complex and more expensive to set up. But granular sells for a higher price. And it’s much easier to transport and spread.
My personal advice? Start with powder if you’re on a tight budget. Then upgrade to granules once you have consistent sales and cash flow.
Many of my clients started exactly that way. The powder line gives you experience with fermentation and raw materials. Then, when you add granulation equipment later, you already know how to make good compost. That puts you miles ahead of a beginner who buys the full line on day one.
How Much Does an Organic Fertilizer Plant Cost in 2026?
Let’s talk real numbers.
- Small-scale plant (1–5 tons/hour): $100,000 to $150,000
- Medium-scale plant (5–10 tons/hour): $150,000 to $350,000
- Large-scale plant (10–20+ tons/hour): $350,000 to $550,000
But don’t forget the hidden costs. Add 20% to 30% for installation, shipping, and employee training.
Raw materials also make up 50% to 60% of your total operating expenses. That’s why location matters so much. Be close to your manure source. Be close to your agricultural waste source. Every mile of transportation hits your bottom line.
Common Mistakes to Avoid
I’ve made mistakes in this industry. I’ve also watched hundreds of clients make them. Here are the worst ones:
1. Skipping fermentation. You can’t shortcut this step. Uncomposted manure burns plants and spreads pathogens. It’s not fertilizer. It’s a liability.
2. Not testing raw materials. If you don’t know what’s in your raw materials, you don’t know what’s in your finished product. Test for heavy metals, pathogens, and nutrient levels.
3. Buying undersized equipment. Starting small is smart. Buying a machine that can’t handle next year’s volume is not smart. Think ahead.
4. Ignoring dust control. Fertilizer production creates dust. A lot of dust. This isn’t just an environmental issue. It’s a worker safety issue and an equipment longevity issue. Invest in dust collectors.
5. Skipping quality control. If you don’t check the product, you’re gambling with your reputation. And in this market, reputation is everything.
Frequently Asked Questions
How long does the organic fertilizer manufacturing process take?
Composting takes 6 to 12 weeks. The mechanical steps after that—crushing, granulating, drying, cooling, screening, packaging—can be done in a single day once your compost is ready.
What raw materials can I use?
Animal manure, agricultural waste, industrial byproducts, and food processing waste. Always test for heavy metals first.
What is the ideal carbon-to-nitrogen ratio?
Aim for 25:1 to 30:1. If your materials are too high in nitrogen, add straw or carbon-rich material. If too high in carbon, add manure or another nitrogen source.
What equipment do I need?
A compost turner, crusher, mixer, granulator, dryer, cooler, screener, and packaging machine. For powder fertilizer, you can skip the granulator, dryer, and cooler.
Can I start with powder and upgrade to granules later?
Yes. The powder equipment remains useful. You simply add granulation, drying, cooling, and screening equipment when you’re ready.
The Bottom Line
The organic fertilizer manufacturing process isn’t a mystery. It’s a system.
Raw materials → Fermentation → Crushing → Mixing → Granulation → Drying → Cooling → Screening → Packaging.
Each step matters. Each step builds on the previous one. And each step can either create quality or destroy it.
In 2026, the market rewards people who get the details right. The farms are out there. The fertilizer demand is out there. The profit is out there.
Master the organic fertilizer manufacturing process, and you won’t just produce fertilizer. You’ll produce a business that actually works.