Quick Summary
The organic fertilizer production process involves two main phases: composting (balancing C:N ratio, maintaining 55–65°C, regular turning) and deep processing (crushing, granulating, drying, screening, packaging).
Turning organic waste into top-grade fertilizer is a careful science. Not magic. And if you’re thinking about starting your own setup—or just wondering how those bags of black gold land at the garden center down the street—you’re in the right place.
In this guide, as a professional organic fertilizer production line manufacturer, I’ll walk you through each stage of the production process—from composting to packaging—and share key insights on avoiding common mistakes, choosing the right equipment, and scaling your operation for profitability.
Why Should You Care About Manufacturing Organic Fertilizer?
Recent farm reports show that over 60% of the world’s farmland shows some level of soil damage tied to heavy chemical fertilizer use. Not great. Farmers feel it first, but the impact rolls downhill to anyone who eats. Simple as that.
But here’s the opportunity:
Global sales of organic fertilizer are on track to reach about $15.6 billion by 2026. Farmers need options that don’t wreck their soil, fast. Chemical-heavy fixes keep burning the ground, season after season, while margins shrink and pressure builds. Organic waste is piling up everywhere. Simple as that.
Manure, food scraps, and crop residues. These things that most people throw away.
Pro Tip: The raw materials for your organic fertilizer production process are probably sitting in your local area right now, waiting to be transformed.
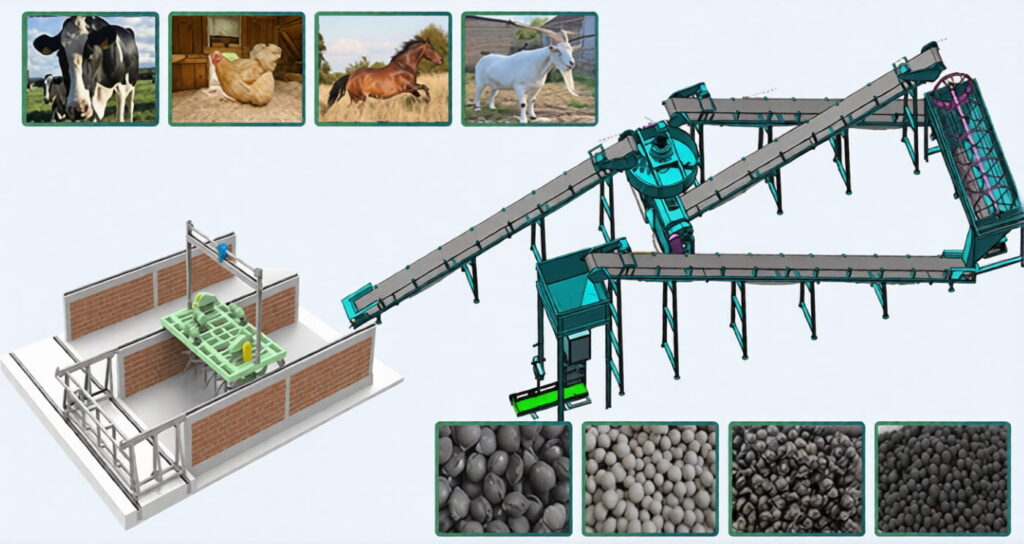
The Organic Fertilizer Production Process
The entire organic fertilizer production process breaks down into two main phases:
- 1. Composting (where biology does the heavy lifting)
- 2. Deep processing (where machinery takes over)
Phase 1: Composting—The Biological Magic
Step 1: Raw Material Preparation
You can’t just toss random organic waste into a heap and walk away. That never works. First thing in organic fertilizer production is getting the Carbon-to-Nitrogen mix right, because without balance the pile stalls or turns nasty. Target about 25:1 to 30:1. Right.
Think of it like this:
- Nitrogen sources = manure, grass clippings, vegetable waste (these are your “green” materials)
- Carbon sources = straw, sawdust, dried leaves (your “brown” materials)
Get this ratio wrong, and your compost pile will either:
- Decompose too slowly (too much carbon)
- Turn into a stinky, anaerobic mess (too much nitrogen)
Learned that lesson the hard way in 2023, trying to compost kitchen scraps with barely any browns mixed in. Bad call. Neighbors still bring up the smell. Right.
Step 2: The Fermentation Stage
This is where the real action happens.
Aerobic bacteria start breaking down your organic matter. As they work, they generate heat—and I’m talking serious heat.
Your pile needs to hit 55°C to 65°C (that’s 130°F to 150°F for my American readers). Why so hot?
Two reasons:
- 1. It kills weed seeds (nobody wants fertilizer that plants weeds)
- 2. It destroys pathogens like E. coli and Salmonella
Here’s the catch: letting a pile just sit won’t cut it. You’ve got to turn it often so oxygen gets in, or the good aerobic bugs fade out and the anaerobic ones move in, which means that rotten egg stink and weak compost. Bad stuff.
Bottom line? If you’re working at scale, buy a compost turner. Hand-turning is fine for a backyard bin, not for real production.
Most operations run this stage for 15 to 20 days, depending on climate and materials.
Phase 2: Deep Processing—From Compost to Product
Okay, so you’ve got finished compost. It’s dark, crumbly, and smells like earth.
But here’s the thing: that compost isn’t ready for market yet.
Raw compost is:
- Inconsistent in particle size
- Usually too moist
- Hard to transport
- Difficult to apply with spreaders
That’s where deep processing comes in.
Step 3: Crushing and Mixing
Even after composting, clumps stick around. A high‑moisture crusher grinds it all down into a fine, even powder, which matters because even particles spread nutrients the same way. Simple as that.
For basic organic fertilizer, you could stop there. Want custom nutrient mixes instead? This is the stage to add extras.
Going for a 5‑5‑5 N‑P‑K? Toss in rock phosphate and sulfate of potash while mixing. Looking to kick up biological activity? Add humic acid or helpful microbes.
A horizontal mixer keeps it all blended evenly. No hotspots. No weak spots.
Step 4: Granulation—The Game Changer
Here’s where powder becomes product.
Granular organic fertilizer is easier to:
- Transport (no dust clouds)
- Store (takes up less space)
- Apply (works with standard spreaders)
There are several ways to granulate:
New Organic Fertilizer Granulator: Uses high-speed rotary agitation to form spherical granules. Works great for most materials.
Disc Granulator: Think of a tilted pan that slowly spins. Water gets sprayed onto the powder and it rolls up into even pellets, kind of like snowballs forming as it moves. Simple and effective. You can literally watch the granules take shape.
Rotary Drum Churning Granulator: Better for high-volume operations.
All three use wet granulation, and they all achieve granulation rates above 93%. That means very little waste.
Step 5: Drying and Cooling
Fresh granules contain 20% to 30% moisture. That’s too wet for packaging.
A rotary dryer brings moisture down to below 15%. Then a rotary cooler brings the temperature back to room temperature.
Why cool them?
Because warm granules in a sealed bag = condensation = clumping = unhappy customers.
Step 6: Screening and Coating
This step separates the winners from the losers.
A vibrating screen sorts granules by size:
- Perfect-sized granules → move to coating/packaging
- Oversized pellets → get crushed and recycled
- Undersized fines → go back to the granulator
Then comes the optional but smart step: coating.
A thin layer of oil or wax prevents moisture absorption and gives your product that professional, shiny appearance.
Pro Tip: Coated granules also flow better through mechanical spreaders. Your customers will thank you.
Step 7: Packaging
The final step.
Automated bagging machines weigh and seal your product into bags—typically 25kg or 50kg. Some operations offer bulk options for large-scale farmers.
And just like that, your organic fertilizer production process is complete.
What Raw Materials Work Best?
This is one of the most common questions I get.
Theoretically, any biodegradable organic matter can become fertilizer. But in practice, here’s what works:
Animal manures: Chicken, cow, pig, sheep—all excellent. Chicken manure tends to have the highest nitrogen content.
Agricultural waste: Straw, corn stalks, rice husks, soybean meal.
Food processing waste: Fruit and vegetable scraps, winery waste, coffee grounds.
Industrial organic waste: Vinasse from ethanol production, biogas residue, sawdust.
Municipal waste: With proper processing, even food waste from restaurants and markets can work.
I recently worked with a client in Costa Rica who’s processing 7-9 tons of food waste daily from local restaurants. They’re turning a disposal problem into a profitable product.
Here’s what matters most: Choose materials you can source consistently and cheaply. Transportation costs can kill your margins fast.
Powder vs. Granules: Which Should You Make?
This depends entirely on your market.
Powdered organic fertilizer:
- Cheaper to produce (fewer machines)
- Faster breakdown in soil
- Great for local markets
Granular organic fertilizer:
- Easier to transport and store
- Works with mechanical spreaders
- Looks more professional
- Commands higher prices
About 80% of commercial operations I’ve studied produce granules. The higher margins usually justify the extra equipment.
The Equipment You’ll Need
Let me break this down by production type:
For powdered fertilizer:
- Compost turner
- Crusher
- Screener
- Packaging machine
For granular fertilizer (add these):
- Granulator
- Dryer
- Cooler
- Coating machine
Budget tip: You don’t need to buy everything at once. Start with the basics and add equipment as you grow.
Common Mistakes in the Organic Fertilizer Production Process
I’ve seen beginners make these errors repeatedly. Don’t be one of them.
Mistake #1: Skipping the C:N Ratio
You can’t eyeball this. Test your materials. Use a calculator. Get it right.
Mistake #2: Not Turning Enough
Compost needs oxygen. If you’re not turning, you’re not composting—you’re pickling.
Mistake #3: Inconsistent Granulation
If your granules vary wildly in size, your nutrient distribution will too. Calibrate your granulator and screen properly.
Mistake #4: Insufficient Drying
Moisture above 15% leads to mold and caking. Buy a moisture meter and use it.
Mistake #5: Ignoring Dust Control
Dust isn’t just annoying—it’s lost product and a health hazard. Invest in proper ventilation and dust collection.
Real Numbers: What You Can Expect
Let’s talk about the stuff that actually matters.
A small organic fertilizer setup pushing 2–3 tons an hour can run anywhere from $200,000 to $500,000 to get off the ground. Big number, sure. But look at the math:
- 2 tons/hour × 8 hours = 16 tons/day
- 16 tons × 250 working days = 4,000 tons/year
- Average selling price: $200-$400 per ton
- Potential revenue: $800,000 to $1.6 million per year
Margins vary widely based on your raw material costs. If you’re getting waste for free (or getting paid to take it), your margins look very different than if you’re buying materials.
I’ve seen operations achieve 30% to 50% gross margins when done right.
Is This Business Right for You?
Honestly? It depends.
You’ll succeed in the organic fertilizer production process if you:
- Have access to consistent raw materials
- Understand basic biology and chemistry
- Don’t mind getting your hands dirty
- Can sell to local farmers and gardeners
You’ll struggle if you:
- Expect overnight success (this takes time)
- Hate dealing with permits and regulations
- Can’t handle the physical demands
Final Thoughts
Look, I’ve covered a lot of ground here. The organic fertilizer production process might seem complex, but it breaks down into manageable steps:
- 1. Balance your materials
- 2. Compost properly
- 3. Crush and mix
- 4. Granulate (if making pellets)
- 5. Dry and cool
- 6. Screen and coat
- 7. Package and sell
Start small. Learn the craft. Scale when you’re ready.
The world needs more people turning waste into resources. Maybe that’s you.
Your next step: If you’re serious about this, I’d recommend visiting an existing operation. See the process in person. Ask questions. Take notes.
Then come back and re-read this guide. It’ll make a lot more sense once you’ve seen it in action.
Got questions? Drop them in the comments. I read every single one.

Thank you very much for your guide in production of organic fertilizer. The part that seems to be a bit tricky to me is the 25:1 part. Exactly what raw materials are we mixing here? Does this mean I can’t mix animal manure and vegetable waste only? What do you suggest can be my mix as a beginner. Let’s say I able to get animal waste and vegetable waste. Is this enough material to use or do I need to find any other material?